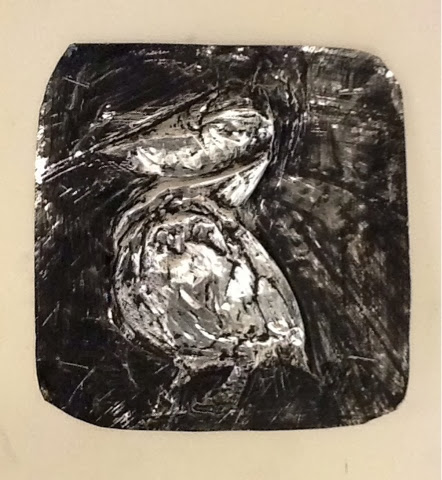
The students were required to show a) clear outlines by continuously pressing over their contour lines, b) 3D relief by rubbing into the spaces of their metal shapes until the area raises with the heat of the metal. Lastly they need to show texture in the image-repeating lines, dots, etc to create actual raised texture. 8th grade painted a wash of black ink overt their finished pieces and scrubbed away the raised relief with a wire mesh sponge brush for a burnished effect. Here are the results!
Thursday, November 7, 2013
8th Grade Metal Relief
I always love to mix up the medium every few lessons, and a unique challenge I find is working with metal-aluminum pans, or metal pie tins. Using a dull pencil or paint brush bottom, the students simply draw into the back of the metal (over a magazine cushion) and watch the lines raise up on the other side. First we looked at 19th century artist James Audubon & his bird studies. After doing a bit of research, they selected an Audubon painting to recreate into their metal pans.




October Tints & Shades!
Here are some samples of what we created!


Friday, October 11, 2013
2nd Grade Midnight Owls!
First, after covering the tables with newspaper, I gave them some dark grey pastel paper I had ordered for the big kids. We took blue chalk and outlined a masking tape roll in the center of our paper. Then, I demonstrated how to use the side of the blue chalk to lightly shade around the moon circle and smear to fill the paper edges. (Remind them not to blow the chalk dust, but rather walk it to the trash can and tap the back of their papers gently). Next I gave them white acrylic paint and sponge brushes and let them paint inside the moon-it's ok if it's not perfect here. After handing them a wipe to clean their hands, they use that very wipe to gently smear rings around the moon, allowing the white paint to blend Into the blue chalk, creating that awesome moon glow in the sky. I tell them not to overdo it so they don't remover the chalk! It's important to touch the edges of the moon when smearing to pull the paint into the blue to blend.
Finally, quiet tables received black paint and painted a bumpy diagonal line across bottom for their owl to sit on. They are allowed to add a few more small ones with a skinny brush. Fort the owl, we simply drew a nice cream cone-a "V" with a bump on top, fill it in black and add pointy triangle ears. If there was extra space they added a couple more baby owls. Voila!!!
Next week we will add gold slanty eyes using metallic acrylic paint....


Friday, October 4, 2013
Batik Pumpkins
Hello October! The month of the amazing pumpkin. One of my favorite go-to autumn lessons is the batik, or crayon resist pumpkin lesson! I tried it with kindergarten this week, and here are the basic steps. Use a strong tag board-preferably white-but I've gone dark as well. Use fat chalks to draw the contour lines of a "bumpy pumpkin" I have them draw a tall oval in the middle of the page, then long "C" curves on the left and right to add the bumps.

NOW is time for oil crayons. I reiterate they must not touch the chalk lines, but to color brightly and solidly in the spaces only. We then paint black tempera allll over he picture (adding a drop of liquid soap to the paint-makes it wipe off easier) and begin handing out wipes for wiping away the paint. (I have my delicious GoJo soap ready for the end of class-they love it)
I explain that in a fight, the paint beats the chalk, but the oil crayon resists, or beats the paint! (Or discuss oil vs water) here's how they turned out...


Wednesday, October 2, 2013
Owls & James Audubon
8th grade is doing an incredible job on their realistic oil crayon owls. They were asked to select an owl photo from the Internet and crop it to just the eyes, studying the values and textures with detail. We used our iPads as photo references as we drew largely, filling our compositions and layering our color by blending. Here are just a few that finished early!


Subscribe to:
Posts (Atom)